
The Ultimate Guide to Using Canva
We know Valentine’s Day isn’t for a while yet, but this could pretty much be a love note to Canva from yours truly. Canva is arguably one of the most significant tools for social media managers. So, it’s incredibly important that you’re utilizing ALL of its features! Let’s dive into the ultimate guide to using Canva!
Editing Features
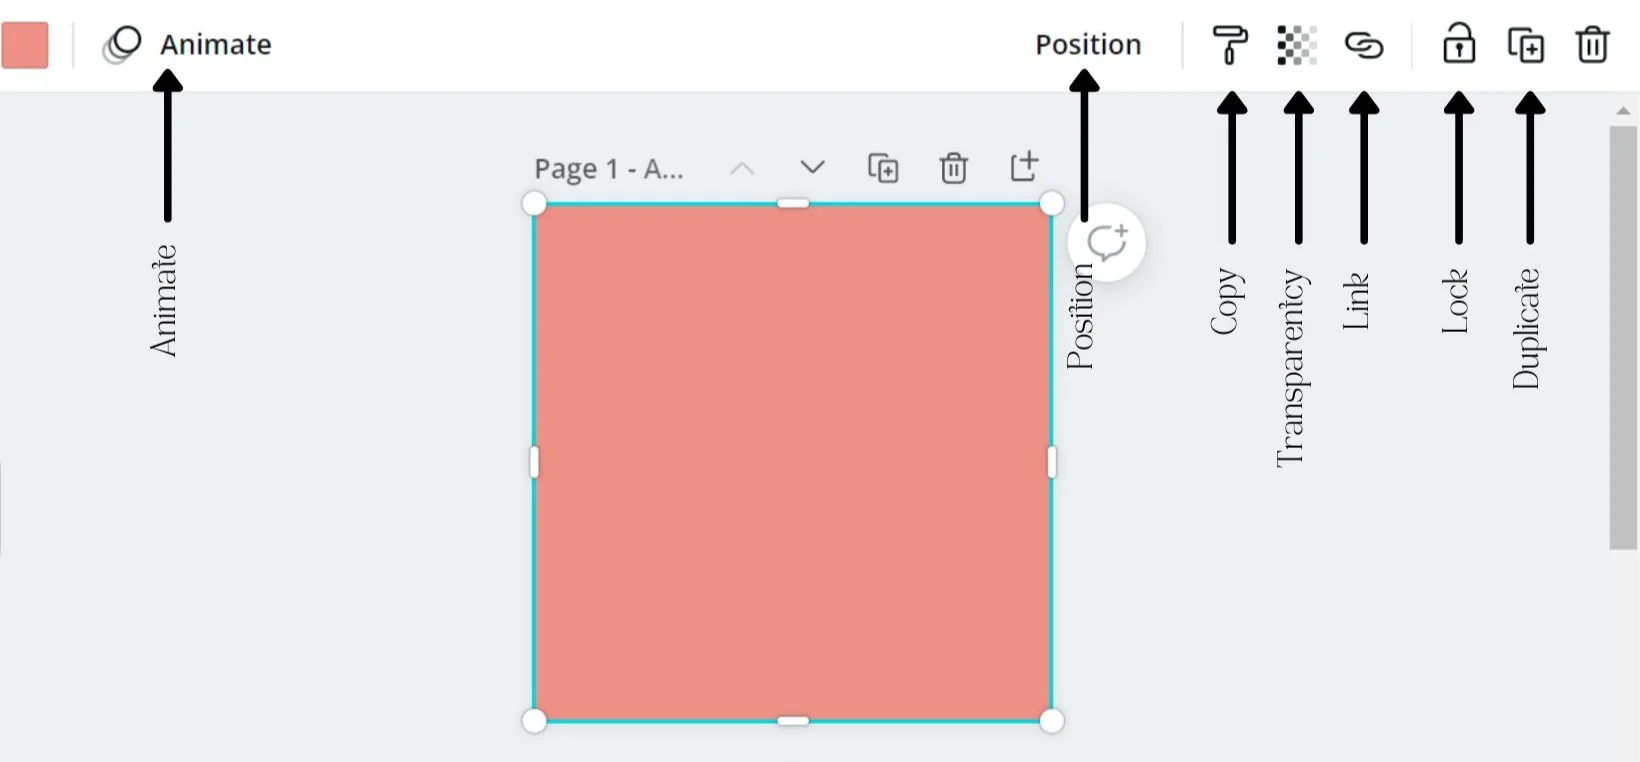
These features can be found on the top bar menu, from left to right, when you've selected an object.
Animation: We're in LOVE with this feature. This allows you to add some movement to your elements, text, photos, or the whole design. With nothing selected, you can add it to the entire page, or if you want a specific object, click on that only and add an option in.
Position: This can be a lifesaver! To use, click on an element, photo, or text and it should appear in the right-hand corner. Move the piece forward or backward or change the alignment on the page. This tool is so helpful when it comes to trying to make an item centered on your design.
Copy: The paint-roller icon allows you to copy one piece onto another. If you have 2+ of the same elements, this can help you make them match up without moving them!
Transparency: This adds the perfect depth to your design. Play around with this feature as much as you can, because it can surprise you how much it can add to your design.
Link: If you want to link an item to a website or another page, you can use this feature to do so seamlessly!
Lock: Lock it down. Everything. The worst is when you accidentally move a piece that was already exactly where you wanted it. This is especially useful when it comes to background pieces. Plus, you can always unlock it when you need to.
Duplicate: This replicates your exact slide into a new page. This feature will be your best friend when you have templates or even with carousel Instagram posts. My favorite time to use it though is when I am going back and forth on two ideas. Do I like this verbiage better or this one? Or this element over this other one? Create a duplicate slide and try out both options, then you can compare it and delete the other without having to go back and re-change it.
Group: With two or more objects selected, you can lump them together. It's great for when you want text to stay together or a few elements!
Categories:
Templates
Even if you have graphic design experience or want to create something completely original, templates are a great place to get your ideas flowing! Start by looking through the templates and most of the time an idea will come! Even if you end up throwing out the whole template, they are a great base to help you get started.
TIP: Change it up! No one wants to see the same template on their feed. Find small ways to make it your own - update it with your brand colors, add your brand fonts, new pictures, move a few things around - it will be unrecognizable!
Elements
Elements give your design an extra flare and can really pull the whole thing together. This is the broadest category because it includes just about everything you need! Choosing elements is a step that can be a little time-consuming because it feels like the list never ends!
TIP: Try these search terms if you’re unsure of what to look for:
Texture
Doodles
Pattern
Hand-Drawn
Paper
Photos
Uploading your own is definitely a way to make your design the most personalized. But, sometimes we don’t always have that resource! In this case, Canva has an entire stock photo collection. If you can’t find one you’re looking for, under the "more" section, there are more stock photo website connections available.
TIP: Use their photo editing options. You can add filters, cut out the background, turn your photo into a mock-up, and many more!
Text
I wish I could explain how many hours I’ve spent trying to get the text just right on a design. Most of the time, the text and typography are the most important part because the quality of your message starts with what’s said in the graphic, so it needs to be readable. Take your time on this part because you want it to be just right.
TIP: If you can, do something else for a minute, and then come back and look at your text. Think about it from a new perspective and answer the following questions:
Is the font and size readable?
Did you spell check? Multiple times?
Does the color stand out enough from its background? Sometimes it’s helpful to change the brightness on your computer for this!
Is it aligned? Under the "Position" tab in the right-hand corner, you can fix the alignment.
Audio
In my personal opinion, I don’t like using the audio feature unless it’s for a very specific purpose! If it’s a general Instagram or Facebook video or a voice-over (it allows you to record yourself directly on the tab!), I’ll go for it; however, on reels and TikToks, it’s important to try out trending sounds that the apps provide to you!
TIP: Think about the tone of your brand and the design! Music sets the tone in a big way, so make sure it fits with the rest of the content or it can throw the whole thing off.
Videos
Video content is the queen of social media right now! So, when it comes to Canva’s video feature, use it up! They have tons of great stock videos for you to use.
TIP: The “Backgrounds” category is my favorite! They are videos of less distracting, toned-down scenes that are perfect to use in the background of many designs. You can even right-click, “detach the video from the background,” and turn the transparency down lower if you want it to be completely out of the focal point but still eye-catching.
Styles
If you uploaded your brand guidelines into the “Brand Kit” you’ll have that available to you here! Not only that, but they also have a variety of color palettes and font combinations already chosen for you to use!
TIP: Upload your fonts and color to your brand kit as soon as you can!
Background
Backgrounds are a great way to add depth to your design. While many of the templates use graphics from the “elements” section, this can be a great place to find additional options.
TIP: (1) Detach it from the background (right-click and it's the last option on the pop-up menu), I know that sounds like it defeats the purpose, but this way you have fewer limitations on editing it, such as changing the transparency and the sizing. (2) After you do this, lock it into place!
Charts
The “elements” section has a lot of options for charts BUT you will have to edit them yourself. With the charts feature, you can enter in the amounts you’re hoping to show, and it creates the chart for you!
TIP: Use the “animation” option on these. It takes a basic chart and turns it into an attention-grabbing statement!
Logos
If you set up your brand kit, you’ll find your logos listed here! This is a quick way to make sure your brand is seen!
TIP: Have several of your logo options available! Upload the original, vector, square, circle, full-color, black & white, small, large, and/or whatever other options you have, because you never know when one will fit better with a design.
More
Don’t sleep on Canva’s “more” additions! Canva has so many features it couldn’t possibly fit in one menu, and although these additional features may be forgotten a time or two, they can make your design pop! They have GIFs, QR Codes, Google Maps, YouTube, etc. Take the time to know what else hides behind that meatball menu, so you can use it!
TIP: If you’re on the Pro subscription, they have options to connect additional accounts, like HubSpot, YouTube, Bitmoiji, so you can cross-share and save your content and even add in content from those accounts!
We hope with this guide you'll be a Canva expert in no time!